Marshmallows have an interesting history. I never realized until recently that there is an actual marshmallow plant from which the roots were traditionally used for medicinal purposes, and later to give marshmallows their shape and form. {Now gelatin is most typically used instead.} The sweet marshmallow has roots in Egypt but was later transformed in France to be more like the marshmallow as we know it today.
I love roasting marshmallows for s’mores, one of my nostalgic favorites, but other than that I’m actually not a big fan of marshmallows. I’m sure I liked them as a kid but especially now, they just seem so strange and out-of-this-world. But I have always heard how they are so much better made from scratch so they have been on my never-ending to-do list for a long long time now. They have always seemed so complicated, and I don’t own a candy thermometer, so I have just never gotten around to making them.
My older son absolutely loves marshmallows and with Easter next week I thought that making homemade Peeps would be a fun project with my boys. {Even though my younger son doesn’t really know what to think of marshmallows and spits them out, he had fun cutting them in shapes and playing with the sticky marshmallow “dough”.} After referencing several recipes, I settled on one from King Arthur Flour because I’ve had good luck with their recipes in the past and I love their products. It is very similar to Martha Stewart’s marshmallow recipe and also the one from Alton Brown.
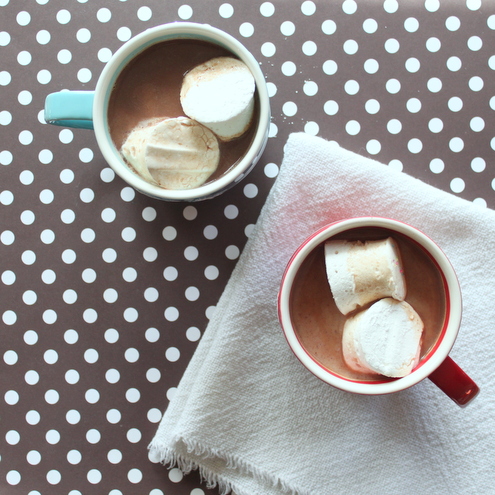
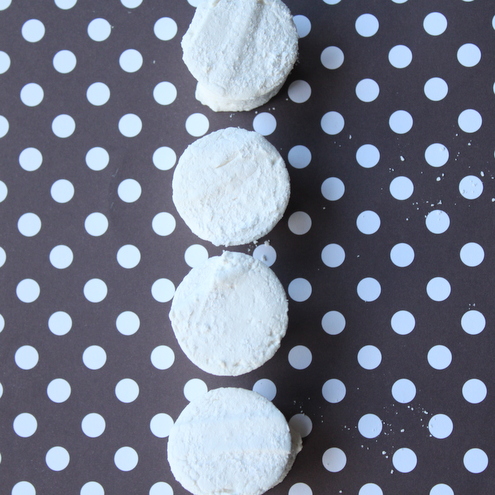
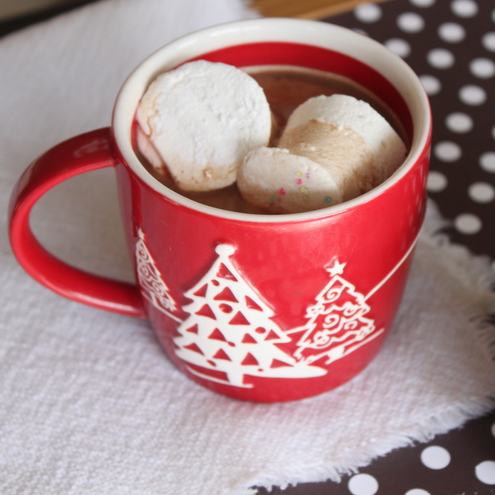
I successfully made my first batch of marshmallows without a candy thermometer and they turned out to be so much easier than I anticipated. From comments I read, this recipe from King Arthur Flour makes a stiffer marshmallow which was perfect for my family because it was easy for my boys to cut them into shapes with cookie cutters. And the s’mores that my husband and son roasted with the homemade marshmallows were a pretty tasty treat. I can definitely see more marshmallow-making in my future and I can’t wait to experiment with different flavors and ways to decorate them {coated in chocolate, sprinkles, crushed candy, etc.} for gifts and party favors.
*Some sources use cornstarch to coat the marshmallows and keep them from sticking. I prefer using solely powedered sugar because I really can’t stand cornstarch.
**For mini marshmallows, you can try piping the marshmallow “dough” from an icing piping bag.
- 3 1/4-ounce packs unflavored gelatin
- 1 cup cool water, divided
- 1 1/2 cups sugar
- 1 cup light corn syrup
- 1/8 tsp salt
- 1 Tbsp vanilla extract or other flavoring
- Combine the gelatin and 1/2 cup cool water in a mixing bowl fitted with the whisk attachment.
- In a large saucepan, combine the remaining 1/2 cup cool water, 1 1/2 cups sugar, 1/8 tsp salt and 1 cup corn syrup.
- Cook the mixture over medium heat until the sugar dissolves, stirring constantly.
- Increase the heat to high and cook, without stirring, until the syrup reaches 240 degrees on a candy thermometer. If, like me, you don’t have a candy thermometer, cook the syrup for 8 minutes.
- Remove the syrup from the heat.
- With mixer on low, pour the syrup into the softened gelatin and whisk to combine.
- Increase the speed to high and beat the mixture for 8-10 minutes until it is thick, fluffy and cool enough to handle with your fingers.
- Whip in the vanilla extract toward the end of the mixing time.
- Dump the marshmallow mix into a greased 9×13 pan.
- Sprinkle the top of the marshmallows with powdered sugar. *If covering your Peeps in sprinkles, don’t sprinkle powdered sugar over the top or the colored sprinkles won’t stick.
- Cover the pan with a greased sheet of plastic wrap and let the marshmallow rest for several hours or overnight.
- Cut the marshmallows with a greased knife or greased cookie cutters, and roll in sprinkles or other toppings as desired.
- Servings depend on size of the marshmallows.
- Store marshmallows in an air-tight container at room temperature.