
Making Gingerbread Houses

 (No Ratings Yet)
 Print This Recipe


Growing up we made gingerbread houses just about every year using graham crackers and milk cartons. As I kid, I really didn’t care what they were made out of because I was so focused on all of the candy. These days you can buy gingerbread house kits that come with candy, frosting and the works. But I have always wanted to try making them from scratch so this year my three-year old son had a couple of friends over for a gingerbread house decoration party. I figured that at three years old, even if the houses were a disaster, they wouldn’t care because they would just be excited about the candy. I was pleasantly surprised with how easy it turned out to be to make basic gingerbread houses.
They definitely take more time than buying a kit but by making them from scratch you can customize your design and candy supply. And if you have older kids, they can help with the baking and construction, too.
I planned to start making the houses during the week before the gingerbread house party but, as is typically the case, life got in the way and I ended up baking and building four gingerbread houses the day before. I made the dough in the morning, let it chill during the afternoon, and then started baking in the evening. Admittedly, I was stressed at first, thinking that I wouldn’t get them done or that they would be a disaster. Then I got into the therapeutic baking mode and realized that it was a piece of…gingerbread. I was able to eke out four houses from three batches of gingerbread cookie dough using a pattern that I got from an old newspaper clipping.
I used a basic Gingerbread Cookie recipe with buttercream frosting. Royal icing is typically the icing of choice for gingerbread houses because it dries really hard. I didn’t want to mess with raw eggs knowing that the kiddos would most likely sample the frosting so I opted for my basic buttercream frosting. It ended up being stiff enough to hold the houses together without any problems. {I can’t comment on how the buttercream frosting would hold up if you are planning to store your house and keep it for years to come.}
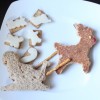
I made patterns out of waxed paper and then used a pizza cutter to cut the house shapes out of the dough. I knew that I wasn’t going to have much extra dough so I cut out the pieces prior to baking them so that I could roll out the scraps for additional pieces. If you have plenty of dough, I have read that baking the gingerbread in large slabs and then cutting out the pieces while the gingerbread is still soft and warm works well, too, and allows you to get really accurate with your patterns. My way worked fine because I was making such basic shapes and houses. Even though the pieces puffed up a bit while baking the houses still fit together without any problems and the icing trim covered up any major holes.
Maybe some year I will decorate a house again but this year it was all for the kids. I bought a variety of candy and then we let them loose with a cup of buttercream frosting. I am already planning ideas for next year because I think we have a tradition in the making!
| Making Gingerbread Houses |
- Gingerbread Cookies
- 1/2 cup shortening
- 1/2 cup sugar
- 1 tsp baking powder
- 1 tsp ginger
- 1/2 tsp baking soda
- 1/2 tsp cinnamon
- 1/2 tsp cloves
- 1/2 cup molasses
- 1 egg
- 1 Tbsp vinegar
- 2 1/2 cups flour
- Gingerbread House Patterns in Waxed Paper or Cardboard
- 2 5×6-inch rectangles {for the roof}
- 2 4×5-inch rectangles {for the sides of the house}
- 2 trapezoids measuring 5 inches across at the bottom, 6 inches tall to the peak {for the front and back of the house}
- Buttercream Frosting
- 3 3/4 cups powdered sugar
- 1/2 cup butter, softened
- 1 tsp vanilla
- 3 Tbsp milk
- Beat the shortening and the sugar on medium speed until they are creamed together.
- Mix in the baking powder, ginger, baking soda, cinnamon and cloves.
- Stir in the molasses, egg and vinegar.
- Gradually add the flour and mix the batter until it is blended well.
- Divide the dough in half, cover each part with plastic wrap and chill the dough for at least 3 hours.
- Working with a small portion of dough and leaving the rest covered in the refrigerator, roll out the dough to about 1/4-inch thickness on a floured surface.
- Cut the dough into the shapes of your choice using patterns out of waxed paper or a thin cardboard and a pizza cutter.
- Place the shapes on a greased cookie sheet.
- Bake the cookies at 375 degrees for 6-8 minutes or until the edges are just turning light brown. You want them to be soft enough so that the houses don’t crumble but you also don’t want them to be so soft that they fall apart.
- Let the cookies cool for one minute and then transfer them to a wire rack to cool completely.
- Mix the ingredients.
- Beat them for several minutes until a smooth, creamy frosting forms.
- Cover a piece of cardboard with foil or decorative paper for the base.
- Pipe buttercream frosting along the bottom and edges of one of the sides of the house and the front.
- Stick the pieces together on the base. They will help to hold each other up.
- Then do the same with the other side and the back of the house and stick the pieces together.
- Let the base of the house rest until the frosting hardens to ensure that it is sturdy enough to hold the roof pieces.
- Pipe frosting along all of the top edges of the house and then carefully place the roof rectangles on top.
- Fill in any gaps with icing and make sure the house seems secure.
- Let the frosting harden for several hours or overnight before decorating it.


Tags: Christmas project, edible art, food art, gingerbread cookies, gingerbread house, gingerbread houses, homemade gingerbread house, how to make your own gingerbread house, winter project


Fri, Jan 13, 2012
Christmas, Cookies, Desserts, Fun Family Activities, Holidays, Party and Decorative Ideas, Search by Course